I only had a couple of hours today to ride and managed to get a great one in. I wanted to see how the reconstruction of Route 2 went and I found a few nice dirt roads to fill in the boring parts.
ADV Ride Report
The KLR might be the perfect motorcycle. I can ride the daylights out of it on the twisty parts of Route 116 and tackle anything that counts as a road around here. It allows me to see everything I want to.
Showing posts with label KLR650. Show all posts
Showing posts with label KLR650. Show all posts
Sunday, March 25, 2012
Thursday, February 23, 2012
Springing Back to Ride
In the winter I cover up my bikes, remove the insurance and pull the batteries. I try not to think about riding for the winter and retreat into my video games and books. This year however we really didn't have a winter. I decided I'd had enough and put both bikes on the road a week ago.
The KLR was really all set; the only thing it needed was a headlight. $25 for a single bulb! Otherwise the bike is completely sorted out. I made so many modifications to it last season that I can't think of a single thing I would add to it.
The VFR had a dead battery. I replaced it last Friday and took it out for a 20 mile ride and it ran great. It s so nice to ride such a smooth bike again.
I have a group of riding buddies that live in Connecticut, New York and Rhode Island. We've been riding together for about 8 years now. We were all lamenting that we didn't do much riding in 2011 so we decided to meet for lunch and plan some rides in 2012.
My intention was to ride the VFR down to the lunch meet in Connecticut last Sunday. I went to start up the bike and the battery wasn't very strong, but the bike did start. I rode to the ATM and shut the bike off to test it. The battery had almost no power and the bike wouldn't start. I was able to get the bike going down a small incline and pop started it and rode it home, swapping it out with the KLR.
My friends and I made some good plans for the season: at least one ride together a month, a 4-5 day trip to Virginia and West Virginia and some weekend trips to Pennsylvania and the Adirnodacks. We threw in some dual sport rides too, like a 3 day weekend in Vermont.
A couple days later I took the VFR apart and diagnosed the problem as a fried rectifier/regulator. This is a notoriously bad part on the VFR. This is my third one, but I haven't replaced one since 2005. I'm waiting for the new one to arrive now.
The VFR has 99,820 miles on it. Last year I started the season with 97,000 and thought for sure I would break 100 K. Now the R/R is holding me back. When I do break it I will post up some kind of maintenance report on how the VFR has fared over those 100,000 miles.
It's felt great to be riding again. I felt deflated after my aborted trip in August so the several month lay-off has really helped. Look for a more active blog with more ride reports this year.
Wednesday, August 17, 2011
Nothing Left But the Packing

This is not how I usually like to have my bike about a day before I leave on a major trip. I needed to wait until the last minute to put on some new tires to maximize their durability.
My friend Craig came over tonight and brought his No-Mar tire changer to do the job right in the garage. It was pretty quick, only about an hour to change both tires and tubes.
I went with the Continental TKC-80's which seem to be the favorite of people doing the Trans-Lab. They'll offer a good ride on the asphalt as well as needed grip in the gravel. They will also last the entire trip. A number of my friends run them so I'm anxious to see how they do.
 | |
| new front tire |
 |
| few things in motorcycling are better than new tires |


Thanks Craig!
Tomorrow's my last day at home. I'm a bit sad and anxious but it's time for this adventure to begin. The only thing left to do is pack.
Sunday, August 14, 2011
Making a Chain(ge)
This was my last weekend home so I needed to get some final preparation work done. I started a list of stuff to bring and got most of what I needed while shopping with my wife. On Saturday I took a ride down to Connecticut to meet three friends; each of whom have helped me get ready for the trip. I packed the bike like I would while traveling and even strapped a (empty) gas can to one of the panniers. The bike did great with the exception of a bungee cord I placed too close to the muffler. Better to know now than in Labrador.
I'm 2/3rd of the way through final work on the bike. Changed the oil last night and changed the chain and sprockets today.
 The engine sprocket was very difficult to remove. It took a cheater pipe on my ratchet and my wife holding down the rear brake to finally persuade it to come off the spline. You can see in the picture how the teeth are starting to turn. The new sprocket is behind it for reference.
The bike has almost 15,000 miles on it. I could have gotten another few thousand miles out of the chain/sprockets if I was riding local. But there's no way it would have lasted through Labrador.
I've bought my chain and sprockets from Sprocket Center for years. Just select the bike you want and they'll send you the correct chain and sprockets in one package.
 Having a new chain and sprockets is like getting new tires. Security in that you won't have to deal with it for a while.
Finished up some other stuff too: cleaned out the air filter and spent the night in the new tent Friday night.
The last thing to do to the bike is put on new tires. My friend Craig is going to help me with this on Wednesday.
This trip is looking serious now. Four more days of work.
I'm 2/3rd of the way through final work on the bike. Changed the oil last night and changed the chain and sprockets today.

 | |
| I went with the stock gearing. |
 |
| rear sprocket is not as worn as the front one |

Finished up some other stuff too: cleaned out the air filter and spent the night in the new tent Friday night.
The last thing to do to the bike is put on new tires. My friend Craig is going to help me with this on Wednesday.
This trip is looking serious now. Four more days of work.
Saturday, August 6, 2011
Braking News
I finished the last of the bike upgrades today. I replaced the stock front brake line with a stainless steel unit. I also replaced the pads (front and rear) with EBC HH pads.
I debated on replacing the pads. Here are the old and new, side by side:
 There really was still a lot of life left in the old pads. The wear limit is 1mm, extremely small. One time I ran a pad on my VFR down to the backing plate and another time a riding buddy let his go so far that the pads actually fell out of the caliper while parked. With a trip of this length I didn't want to have to even wonder how the brakes were.
The new line and pads were very easy to install, but bleeding the system was a bear. I worked on it for an hour or so last night but could not get any fluid out of the master cylinder. The fixes I read online were not consistent except to recommend a product called Mityvac. It's a vacuum pump, which literally sucks the fluid into the caliper.
Today I picked up a Mityvac system and my friend Erik from Ashfield came by to lend me a hand. With the Mityvac it literally took us two minutes to get the air out of the system. We flushed the entire system and put all new brake fluid in.
We then moved on to replacing the rear pads and flushing the 4 year old fluid out of the master cylinder. We did this the traditional way and had no issues with air.
Erik gave me some tips on how to seat the new pads to the rotors. He suggested getting the KLR up to about 80 and slamming the brakes, slowing down to 30. So, we took it to the local interstate highway and did just that. Erik ran blocker for me from behind. I know it looked strange and suspicious and a number of car drivers stared at me when they passed. But I did it.
Wow, the braking performance now is amazing. The old brakes felt wooden; I never wanted to try to stop fast on a yellow light, I always ran them. I noticed two things about the KLR brakes now. When I was jamming them on I noticed the GPS could not accurately keep track of the speed. It would say "60mph" when I knew I wasn't going that fast. A second later it said "43." The KLR was decelerating much quicker than the GPS could pick it up. The other thing I noticed was the G-forces I was getting from the rapid deceleration. I got a headache, the KLR was stopping that fast. Never thought I'd say that about a KLR. Erik told me the EBC HH pads are actually for racing applications!

The only things left to do on the bike are to replace the tires and the chain/sprockets for my trip. I'll do that when I have about a week to go.
I debated on replacing the pads. Here are the old and new, side by side:

The new line and pads were very easy to install, but bleeding the system was a bear. I worked on it for an hour or so last night but could not get any fluid out of the master cylinder. The fixes I read online were not consistent except to recommend a product called Mityvac. It's a vacuum pump, which literally sucks the fluid into the caliper.
Today I picked up a Mityvac system and my friend Erik from Ashfield came by to lend me a hand. With the Mityvac it literally took us two minutes to get the air out of the system. We flushed the entire system and put all new brake fluid in.
 | |
| Nice sight! |
Erik gave me some tips on how to seat the new pads to the rotors. He suggested getting the KLR up to about 80 and slamming the brakes, slowing down to 30. So, we took it to the local interstate highway and did just that. Erik ran blocker for me from behind. I know it looked strange and suspicious and a number of car drivers stared at me when they passed. But I did it.
Wow, the braking performance now is amazing. The old brakes felt wooden; I never wanted to try to stop fast on a yellow light, I always ran them. I noticed two things about the KLR brakes now. When I was jamming them on I noticed the GPS could not accurately keep track of the speed. It would say "60mph" when I knew I wasn't going that fast. A second later it said "43." The KLR was decelerating much quicker than the GPS could pick it up. The other thing I noticed was the G-forces I was getting from the rapid deceleration. I got a headache, the KLR was stopping that fast. Never thought I'd say that about a KLR. Erik told me the EBC HH pads are actually for racing applications!

The only things left to do on the bike are to replace the tires and the chain/sprockets for my trip. I'll do that when I have about a week to go.
 |
| Ready to Go |
Wednesday, August 3, 2011
Subframe Bolts
I still had the bike apart when two packages came from UPS this afternoon. I have a new stainless steel front brake line which will improve stopping distances (notoriously weak on the KLR). I also got a heavy duty tube, some oil filters, a helmet lock extender and the subframe bolt upgrade kit from Eagle Mike.
I've never heard of a KLR subframe breaking but I've seen plenty of ride reports online and even in the Long Way Round series where the subframes did break from overloading. With the extra weight I'm carrying the $5 kit seems like a good idea.
Installation was as easy as unscrewing one bolt at a time and inserting the new, stronger bolts in their place.
There's a great walk through of the procedure here.
I still need to change out a leaky rear tube and install the new brake line and new brake pads.
I've never heard of a KLR subframe breaking but I've seen plenty of ride reports online and even in the Long Way Round series where the subframes did break from overloading. With the extra weight I'm carrying the $5 kit seems like a good idea.
Installation was as easy as unscrewing one bolt at a time and inserting the new, stronger bolts in their place.
 | |
| Upper Subframe Bolt Comes Out First |
 | |
| Stock Lower Subframe Bolt |
 | ||
| Upgraded Lower Subframe Bolt |
There's a great walk through of the procedure here.
I still need to change out a leaky rear tube and install the new brake line and new brake pads.
Tuesday, August 2, 2011
Slow Night
I had to tear the bike down tonight to clean up a wiring job on the heated grips. There was too much slack in the wiring of the left grip and it was catching on the fairing during left hand turns. This required removing the side panels, seat, crash bars, both side fairings and the gas tank.
It takes almost an hour to get the bike down to this state. It only took a few minutes to fix the wiring. One less thing to worry about.
Here's a close up of the AP1 fuse panel I'm using.
I also installed the Go Cruise, but haven't had a chance to test it yet. It looks like it will hold the grip pretty well.
 You slide it down on top of the brake lever with your index finger. The friction against the grip holds it in place.
 | |
| Naked KLR |
Here's a close up of the AP1 fuse panel I'm using.
 | |
| Located directly under the seat, on top of the battery cover |

Monday, August 1, 2011
Tool Tubes Added
This is a cool little trick I picked up online: adding some more luggage capacity in the unused space inside the wheelwell. The tubes are owner's manual holders from Agri-Supply. They cost about $5 each and are watertight. I can stuff all my tire changing tools inside along with some other stuff.
My friend Henry gave me the idea for how to mount them. I wanted to be able to take them off after my trip and not be left with holes in the bags. These insulated conduit hangers worked out pretty well. I added a couple zip ties for insurance.


 This will help clear out some bulky items from the main bags. I'm hoping to fit two weeks of stuff into the two side cases and a top case.
Go-Cruise throttle lock arrived today. So simple to install and looks like it will work perfectly. Will install tomorrow.
My friend Henry gave me the idea for how to mount them. I wanted to be able to take them off after my trip and not be left with holes in the bags. These insulated conduit hangers worked out pretty well. I added a couple zip ties for insurance.


Go-Cruise throttle lock arrived today. So simple to install and looks like it will work perfectly. Will install tomorrow.
Friday, July 29, 2011
Bike Prep
This trip is precisely why I bought a 2008 Kawasaki KLR650 when the new model first came out.
The bike is so much fun, I wish I'd bought one when I first started riding 20 years ago.
But the KLR650 has a number of well-known issues that needed to be addressed before I could leave on a trip like Labrador.
1. The "Doohickey" or idler shaft lever. Lots of concern that on the 2008+ KLRs that the idler spring does not have enough tension. I upgraded my doohickey and spring in March. It's a pretty complicated job (for me). It involved removing two engine cases, using a gear puller and drilling a hole in one of the cases for a new spring.
It took one long night in the garage till 1am but the results were worth it. The stock spring had no tension on it. I shouldn't ever have to worry about it again.
2. Suspension: The stock KLRs have a weak suspension if you want to venture off paved roads. The forks and shock both bottom out quite easy. The back tire wouldn't stay planted over rough, washboard surfaces and the front forks dove like crazy under braking.
After doing a lot of research online I heard universal praise for the Intiminators (fork inserts) from Ricor and the Moab shock from Cogent Dynamics. I bought both.
In March I spent a couple of late nights in the garage upgrading the forks. This involved removing them from the steering head (surprisingly easy) and disassembling them. The Intiminators dropped right into the forks. The hardest part was measuring the correct amount of fork oil to go in.
In May I brought the bike down to my friend Joe's house and replaced the rear shock with the Moab unit. We also removed the swingarm and greased all the bearings.
The suspension upgrades weren't cheap, but the results were certainly impressive and well worth it. The bike now glides over bumps and holes, the suspension soaks everything up. The brake dive is completely gone as is the bottoming out over bumps. The KLR now holds a very strong track on the dirt roads; from the seat it feels unstoppable.
3. Seat: One of the most recent upgrades is a new seat from Sargent. I had put one on the VFR and it allowed me to do 1,000-1,500 mile a day Iron Butt rides. The stock KLR seat was only good for about an hour and a half of riding time. There was no way it would work for 2 weeks.

The Sargent seat is flat and better supports your backside compared to the narrower KLR seat.
4. Body/Engine Protection: The 2008+ KLR650s are vulnerable to expensive damage from tipovers due all the exposed plastic on the fairings. The engine is only protected by a plastic skidplate, which wouldn't hold up to rock grinds or richocets.
I bought the combination skid plate/engine guard and nerf bars from Happy Trails.

I've had this set up for about 3 years and have been very happy with it.
I added a set of Barkbuster hand guards 2 years ago to further protect against tipovers and broken levers.

All this body armor has been a mixed bag. The bike has fallen over twice. Once there was no damage, the other time it fell into a boulder between the Barkbusters and the nerf bars and it shattered a $150 fairing. It also adds a lot of weight to the bike. Overall, I'm happy with the protection as it gives me piece of mind that the bike will make it home if it does go down.
5. Tires: The stock KLR tires are terrible. Lack of grip in the dirt/sand and they wear out quickly. I've been using Maxxis 6006 knobbies for several thousand miles. I love them in the dirt as they give all kinds of confidence. They aren't as bad as you would think on the road either.
For Labrador I decided to go with Continental TKC-80's for their grip in the gravel and ability to last longer than traditional knobby tires. They had a great review in this month's Motorcycle Consumer News.

6. Brakes: The stock KLR brakes are pretty weak. I just ordered a stainless steel front brake line which should help stopping distance.
Convenience & Comfort
- Luggage: For Labrador I need to be able to carry enough for 2 weeks on the road: clothes, tools and camping equipment.
 I needed some luggage that had some volume but was also waterproof and reasonably priced. I went with the SW Motech Quick Release Rack and the Pelican 1550 cases.
I like the racks because they can be removed in about 30 seconds with a screwdriver or a coin. You wouldn't even know they were on there.

The downside to the racks is that you have to relocate the rear turn signals further back to clear the cases. SW Motech gives you a bracket but the end result looks a little cheesy for my tastes.
I bolted the Pelican cases directly to the racks because the racks are so easy to remove anyway. They should hold what I need without being too bulky. They are lockable too.
- Heated Grips: I have heated gloves but they are bulky to carry and the grips are nice for when the temperature drops at the end of the day. I went with the Oxford Heaterz from England. They have the wiring directly in the grip, as opposed to underneath your existing grips. They were pretty easy to install and they appear to be well-made. You have four levels of heat. The only downside to these is that the grips are a larger diameter than stock and it takes some getting used to.

- Centerstand: Invaluable for changing tires and doing chain or other bike maintenance. I have the SW Motech version, which I'm not too fond of. There is no raised tab to put your foot on to lower the centerstand and raise the bike. It's much harder to operate than it should be. It also also distributes the weight in such a way that the bike wants to roll forward, off the stand.

- Fused Panel: I'm running a number of electrical accessories: GPS (Zumo 550), heated vest, lead for a portable air compressor and heated grips. The battery area was a mess of wires all over the place. The fused panel cleans things up nicely and prevents electrical problems. A big thanks to my friend Doug for doing the installation.
-Cruise Control: I ordered a Go Cruise throttle lock for those long highway stretches. It hasn't arrived yet.
I feel like I now have all the major issues taken care of on the KLR. It's like a different bike. Even with all the modifications added to the price of the bike it's still a lot cheaper than a new, unmodified BMW F800GS or a Triumph Tiger XC800. While I wish I had one of those bikes for the 70-80 horsepower and highway touring, the KLR is working very well for me now.
Maintenance
- Valve Adjustment: This is where the story takes a bad turn. I had never adjusted my valves and in March the bike had gone 13,000 miles without it (factory recommends every 6,000 miles). I felt confident about working on the bike and tore it apart to do the procedure.
In the process of installing the correct valve shims (one had almost no clearance left) I accidentally bent an exhaust valve. I was rotating the engine around by hand to check the clearances when one of the shims slipped from its bucket and wedged into the camshaft.
 It took 7 weeks, a ton of aggravation and about $500 to get the bike repaired and running again. Now that its repaired the bike is running great, quieter and smoother than ever before.
-Consumables: Just to be on the safe side I bought a brand new battery to replace the four year old stock one. I also am installing a new set of chain and sprockets. I'm probably going to change the original brake pads too.
The only thing left to buy is a tent.

 | |
| first day of ownership |
The bike is so much fun, I wish I'd bought one when I first started riding 20 years ago.
But the KLR650 has a number of well-known issues that needed to be addressed before I could leave on a trip like Labrador.
1. The "Doohickey" or idler shaft lever. Lots of concern that on the 2008+ KLRs that the idler spring does not have enough tension. I upgraded my doohickey and spring in March. It's a pretty complicated job (for me). It involved removing two engine cases, using a gear puller and drilling a hole in one of the cases for a new spring.
 | |
| doohickey at bottom |
It took one long night in the garage till 1am but the results were worth it. The stock spring had no tension on it. I shouldn't ever have to worry about it again.
2. Suspension: The stock KLRs have a weak suspension if you want to venture off paved roads. The forks and shock both bottom out quite easy. The back tire wouldn't stay planted over rough, washboard surfaces and the front forks dove like crazy under braking.
After doing a lot of research online I heard universal praise for the Intiminators (fork inserts) from Ricor and the Moab shock from Cogent Dynamics. I bought both.
In March I spent a couple of late nights in the garage upgrading the forks. This involved removing them from the steering head (surprisingly easy) and disassembling them. The Intiminators dropped right into the forks. The hardest part was measuring the correct amount of fork oil to go in.
 | |
| forks torn apart |
 |
| Moab Shock |
3. Seat: One of the most recent upgrades is a new seat from Sargent. I had put one on the VFR and it allowed me to do 1,000-1,500 mile a day Iron Butt rides. The stock KLR seat was only good for about an hour and a half of riding time. There was no way it would work for 2 weeks.

The Sargent seat is flat and better supports your backside compared to the narrower KLR seat.
4. Body/Engine Protection: The 2008+ KLR650s are vulnerable to expensive damage from tipovers due all the exposed plastic on the fairings. The engine is only protected by a plastic skidplate, which wouldn't hold up to rock grinds or richocets.
I bought the combination skid plate/engine guard and nerf bars from Happy Trails.

I've had this set up for about 3 years and have been very happy with it.
I added a set of Barkbuster hand guards 2 years ago to further protect against tipovers and broken levers.

All this body armor has been a mixed bag. The bike has fallen over twice. Once there was no damage, the other time it fell into a boulder between the Barkbusters and the nerf bars and it shattered a $150 fairing. It also adds a lot of weight to the bike. Overall, I'm happy with the protection as it gives me piece of mind that the bike will make it home if it does go down.
5. Tires: The stock KLR tires are terrible. Lack of grip in the dirt/sand and they wear out quickly. I've been using Maxxis 6006 knobbies for several thousand miles. I love them in the dirt as they give all kinds of confidence. They aren't as bad as you would think on the road either.
For Labrador I decided to go with Continental TKC-80's for their grip in the gravel and ability to last longer than traditional knobby tires. They had a great review in this month's Motorcycle Consumer News.

6. Brakes: The stock KLR brakes are pretty weak. I just ordered a stainless steel front brake line which should help stopping distance.
Convenience & Comfort
- Luggage: For Labrador I need to be able to carry enough for 2 weeks on the road: clothes, tools and camping equipment.
 I needed some luggage that had some volume but was also waterproof and reasonably priced. I went with the SW Motech Quick Release Rack and the Pelican 1550 cases.
I like the racks because they can be removed in about 30 seconds with a screwdriver or a coin. You wouldn't even know they were on there.

The downside to the racks is that you have to relocate the rear turn signals further back to clear the cases. SW Motech gives you a bracket but the end result looks a little cheesy for my tastes.
I bolted the Pelican cases directly to the racks because the racks are so easy to remove anyway. They should hold what I need without being too bulky. They are lockable too.
- Heated Grips: I have heated gloves but they are bulky to carry and the grips are nice for when the temperature drops at the end of the day. I went with the Oxford Heaterz from England. They have the wiring directly in the grip, as opposed to underneath your existing grips. They were pretty easy to install and they appear to be well-made. You have four levels of heat. The only downside to these is that the grips are a larger diameter than stock and it takes some getting used to.

- Centerstand: Invaluable for changing tires and doing chain or other bike maintenance. I have the SW Motech version, which I'm not too fond of. There is no raised tab to put your foot on to lower the centerstand and raise the bike. It's much harder to operate than it should be. It also also distributes the weight in such a way that the bike wants to roll forward, off the stand.

- Fused Panel: I'm running a number of electrical accessories: GPS (Zumo 550), heated vest, lead for a portable air compressor and heated grips. The battery area was a mess of wires all over the place. The fused panel cleans things up nicely and prevents electrical problems. A big thanks to my friend Doug for doing the installation.
-Cruise Control: I ordered a Go Cruise throttle lock for those long highway stretches. It hasn't arrived yet.
I feel like I now have all the major issues taken care of on the KLR. It's like a different bike. Even with all the modifications added to the price of the bike it's still a lot cheaper than a new, unmodified BMW F800GS or a Triumph Tiger XC800. While I wish I had one of those bikes for the 70-80 horsepower and highway touring, the KLR is working very well for me now.
Maintenance
- Valve Adjustment: This is where the story takes a bad turn. I had never adjusted my valves and in March the bike had gone 13,000 miles without it (factory recommends every 6,000 miles). I felt confident about working on the bike and tore it apart to do the procedure.
In the process of installing the correct valve shims (one had almost no clearance left) I accidentally bent an exhaust valve. I was rotating the engine around by hand to check the clearances when one of the shims slipped from its bucket and wedged into the camshaft.

-Consumables: Just to be on the safe side I bought a brand new battery to replace the four year old stock one. I also am installing a new set of chain and sprockets. I'm probably going to change the original brake pads too.
The only thing left to buy is a tent.

Why Labrador?
In less than three weeks I leave for a 2 week solo motorcycle trip to ride the Trans-Labrador Highway. I'll also be visiting Quebec, Newfoundland, Nova Scotia and New Brunswick.
Why Labrador?
Four years ago a buddy of mine and I rode our Honda VFRs from New York to San Francisco in an attempt to do it in 50 hours or less. We didn't make the time but we spend two amazing weeks on the road exploring the west and iconic places like the Pacific Coast Highway, redwood forests, Crater Lake, Grand Tetons and Yellowstone. Living on a bike for two weeks was life changing and I was eager to do something like that again.


When I bought my KLR in 2008 my ultimate goal was to do a similar trip to Alaska and ride the Dalton Highway. Life and a young son have intervened and the kind of time and money I would need to do such a trip is out of reach right now.
Almost two years ago I started reading ride reports from other motorcyclists about the Trans-Labrador Highway. One in particular caught my eye with its description of the Trans-Labrador:
Over the last 9 months I've read everything I could find on Labrador and Newfoundland, including books and ride reports on ADV Rider. I pieced the route together into a 3,200 mile clock-wise rotation:

The immediate draw is the ride through Labrador, which is almost 600 miles, a majority of it on gravel roads and nearly all of it in pristine and remote wilderness. There's one section that is 260 miles of gravel with nothing in between: no towns, gas, restaurants, houses, nothing. Being born and raised on the east coast that blows my mind. That's like going from NYC to Washington, DC!
The topography and geography is interesting too. According to one book I have, the glaciers only receded from Labrador 10,000 years ago. The land is essentially untouched since with the exception of several outpost towns. Where else but Alaska could I see that?
But there's much more: the Manac 5 Dam in Quebec, one of the largest in the world:

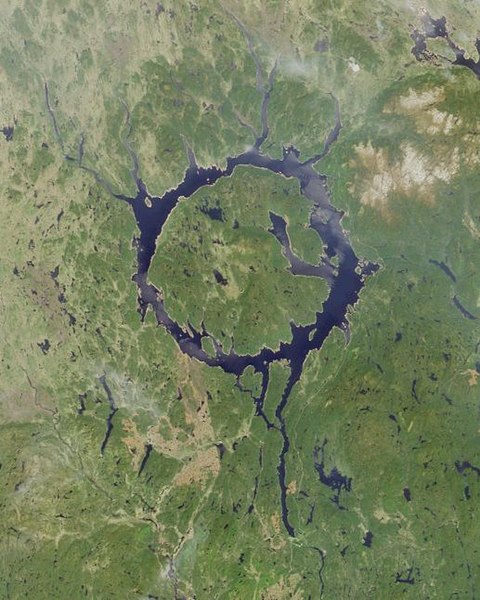
The Manicouagan crater, the fifth largest crater in the world:

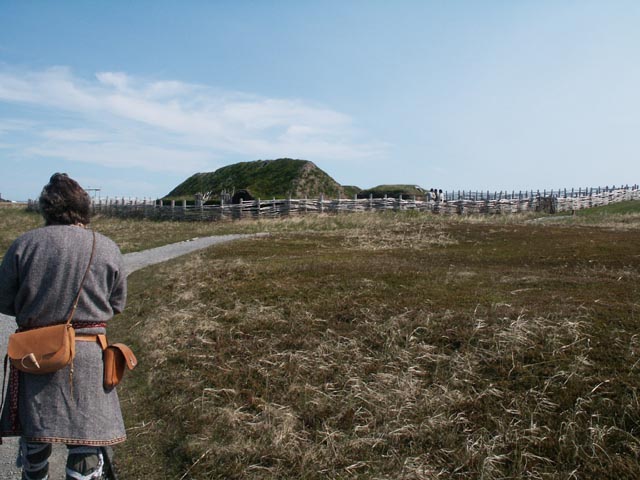
Newfoundland has L'Anse aux Meadows, a Viking settlement from 1000 AD.:

Grose Morne Provincial Park:

and the Western Brook Pond:

and then the Cabot Trail on Cape Breton, Nova Scotia:

I leave on August 19.
Next: Bike Prep
Why Labrador?
Four years ago a buddy of mine and I rode our Honda VFRs from New York to San Francisco in an attempt to do it in 50 hours or less. We didn't make the time but we spend two amazing weeks on the road exploring the west and iconic places like the Pacific Coast Highway, redwood forests, Crater Lake, Grand Tetons and Yellowstone. Living on a bike for two weeks was life changing and I was eager to do something like that again.


When I bought my KLR in 2008 my ultimate goal was to do a similar trip to Alaska and ride the Dalton Highway. Life and a young son have intervened and the kind of time and money I would need to do such a trip is out of reach right now.
Almost two years ago I started reading ride reports from other motorcyclists about the Trans-Labrador Highway. One in particular caught my eye with its description of the Trans-Labrador:
This trip felt to me like it had two distinct parts: the Trans-Lab, and everything else. The Trans-Lab is so epic that everything else sort of pales in comparison. As such, while riding in Newfoundland and especially Cape Breton and Nova Scotia, I couldn't help but compare the experience to the Trans-Lab, and of course it came up a bit short.
...the Trans-Lab portion of the trip was just so astonishingly magnificent that it really would have been hard for the rest of the trip to compete.
Labrador has a draw. There's something about that place that captures the imagination. All I want to do is go back.It would be Labrador then. Real planning started in September 2010 after a discussion with a friend who also wanted to go.
Over the last 9 months I've read everything I could find on Labrador and Newfoundland, including books and ride reports on ADV Rider. I pieced the route together into a 3,200 mile clock-wise rotation:
The immediate draw is the ride through Labrador, which is almost 600 miles, a majority of it on gravel roads and nearly all of it in pristine and remote wilderness. There's one section that is 260 miles of gravel with nothing in between: no towns, gas, restaurants, houses, nothing. Being born and raised on the east coast that blows my mind. That's like going from NYC to Washington, DC!
The topography and geography is interesting too. According to one book I have, the glaciers only receded from Labrador 10,000 years ago. The land is essentially untouched since with the exception of several outpost towns. Where else but Alaska could I see that?
But there's much more: the Manac 5 Dam in Quebec, one of the largest in the world:

The Manicouagan crater, the fifth largest crater in the world:
Newfoundland has L'Anse aux Meadows, a Viking settlement from 1000 AD.:
Grose Morne Provincial Park:

and the Western Brook Pond:

and then the Cabot Trail on Cape Breton, Nova Scotia:
I leave on August 19.
Next: Bike Prep
Subscribe to:
Posts (Atom)